How to lay tiles in the kitchen
The kitchen is the working area of the apartment, therefore, first of all, it should be as convenient and functional as possible. Tile is the most suitable material for facing the kitchen. It is durable, resistant to high temperature, easy to clean, does not absorb odors, reliably protects walls from moisture. Since the tile is a natural material, the walls lined with it will breathe well. In addition, a well-tiled kitchen looks very beautiful. With today’s market abundance, choosing a beautiful tile is not at all difficult. Perhaps it will be more difficult to lay tiles in the kitchen, especially if you decide to do this work with your own hands. But we are also solving this issue. The main thing is to find out as much as possible about how to lay tiles in the kitchen: laying options (they are quite diverse) and examples.
Content
- Tile size and calculation
- Surface preparation for laying
- How to lay tiles in the kitchen
- Tile laying options in the kitchen
Tile size and calculation
In small kitchens, large tiles with sizes of 20×20 or 30×30 are not quite a good solution. The best option would be a 10x10cm tile or mosaic. The thickness of the tile, its ornament is also important. The color and texture of the tiles are selected taking into account the material and color of the kitchen set. The choice of tile type, design and installation option sometimes takes most of the time when deciding on the issue of finishing the kitchen. The main thing in this matter is to understand how to lay tiles in the kitchen to create harmony between all its elements..
So, if the kitchen has dimensions of 8-9 m2, we recommend that you purchase:
- for walls – tiles with dimensions of no more than 15x15cm;
- for a working zone – a tile measuring 10×10 cm.
But be aware that smaller tiles are more difficult to lay, and even more difficult to align when laying.

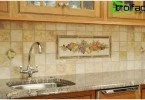
Tiles of small sizes – the most suitable for the working area, but it is laid harder
Before laying tiles in the kitchen, calculate the required amount as accurately as possible. It is better to consider how many tiles will be needed for each wall individually. It should be borne in mind that sometimes you have to cut tiles. Cut tiles should be considered as a whole, and the results obtained should be rounded up.
The kitchen footage is considered in square centimeters.
Surface preparation for laying
How to lay the tiles in the kitchen correctly to get a high-quality and beautiful styling? You need to start with preparing the surface of all the walls. To do this, do the following:
- take wallpaper or old paint and strip the walls;
- treat the surface with a deep penetrating primer to ensure better adhesion of the putty;
- putty all chips and cracks and primed again.
 Tile wall surface preparation
On the prepared and dried surface it is necessary to mark, for which it is necessary to have:
- wooden or metal ruler;
- square;
- plumb line;
- a simple pencil;
- 1-2 tiles.
In the corner of the wall near the floor we glue the first tile onto the solution and draw vertical and horizontal lines from it up and to the side.
How to lay tiles in the kitchen
Each tile is a separate plane and the main tasks when laying it:
- to achieve vertical and horizontal accuracy of all tiles relative to each other;
- clearly follow the pattern of tile joints.

Laying tiles in the kitchen
We lay out the first layer of the tile so that the top edge forms a strictly horizontal line. To do this, you may have to cut the tile with a tile cutter, using a metal ruler. Roughnesses of the cut edge will be covered with a plinth. Next, the tile laying procedure is as follows:
- apply the adhesive mortar to the wall (the area is larger than the tile);
- using a spatula, apply the solution to the tile;
- strictly adhering to the marked marking lines, we attach the tile to the wall surface;
- lay out each tile of this and the next row in the same plane. To check the level, we apply a metal ruler to the surface of the row;
- tap on each tile with a rubber mallet to achieve its ideal position.
If you have to lay the tiles on the working area of the kitchen (at a height of about 80 cm from the floor), then you will need to fix the horizontal emphasis on the wall (metal profile or rail), on which the first row of tiles will rest. This will prevent it from creeping down until the glue hardens. Do not forget to leave a gap of 2.5 millimeters between the tiles: then fill the resulting seams with a special grout. To make the seams the same, we use special distance joints. In the course of laying, we regularly check the level of horizontalness, and verticality – using a plumb line.
Tile laying options in the kitchen
Today there are numerous options for laying tiles in the kitchen, but we will talk about several of them. We are talking about the ways: classic, “diagonal”, “to breakdown”, combined.

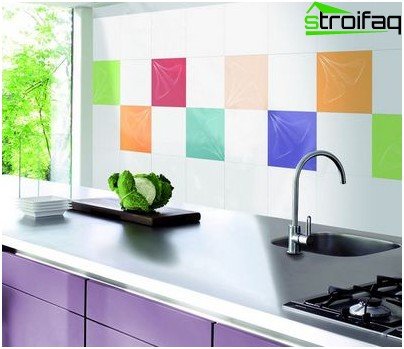
Laying tiles in a classic simple way, an unusual design is created due to the original drawing on the tile
Classical The method is the most common and easiest. For it, square or rectangular tiles are used, which are laid horizontally parallel to the walls. To make the styling look original, you can add decorative design elements to it – decors, panels, borders. This installation option is the most economical – there is practically no tile trim.

The classic way to lay tiles – the most common, easy and economical
Classic horizontal styling option using decorative elements – multi-colored tiles
Diagonal laying out the tiles allows you to create an unusual pattern that looks much more interesting than straight vertical-horizontal lines.

Laying tiles “diagonal” looks more interesting than horizontal and vertical options
A square tile is suitable for this method. Its disadvantage is the high consumption of tiles, since the tile adjacent to the walls has to be cut off. This should be considered when buying tiles. Despite this, this installation option is still very popular, especially when designing an apron for the kitchen.
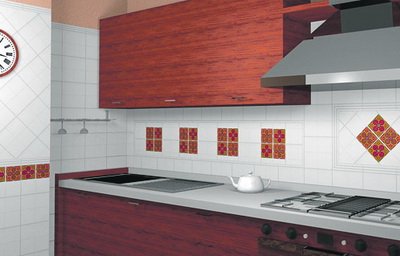
Run-up styling It is used quite often when decorating a kitchen with tiles. In this case, a plain monochrome tile looks best, but the use of square tiles is not ruled out. The “pry” pattern is formed by the method of masonry in horizontal rows.

The “pry” pattern is formed by the method of masonry
It will add originality to the kitchen premises, emphasize the traditional design.

Laying out the tiles will emphasize the traditional design
Combined the option involves laying tiles of the same size, but laid in different blocks: one part is diagonal, the other part is horizontal.
Combined styling method. One option.

Laying tiles in the kitchen in a combined way. Another variant

The combined method of laying tiles in the kitchen. Third option.
To make such a drawing takes time, patience and responsibility. But such a styling option will look professional from a design point of view. With it, you can combine different tile formats or highlight individual parts of the apron (for example, the hood).

The combined way of laying with the selection of the zone under the hood with a beautiful pattern
Well, the combination of different laying directions with borders and decorative panels can become the peak of combinatorial imagination..
All tile laying options have their own special technology, but this is another, separate topic..
Making kitchen tiles can be done in any style. Combining different shades of tile, combining different laying directions, using mosaics with interspersed mirrors, etc., you can create a unique luxury in the kitchen, emphasizing the beauty of decor and furniture.