Since the installation of built-in lights is not a complicated procedure, it can be done independently. If you want to save money on the services of experienced professionals, you must remember that such work must be done very carefully and not in a hurry, especially if you are doing this for the first time.
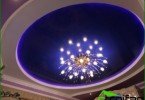
Recessed spotlights are popular in the design and installation of lighting for suspended ceilings. Such lamps allow you to create the required indicator of the illumination of the room, and provide an attractive modern look of the ceiling.
Since the installation of built-in lights is not a complicated procedure, it can be done independently. If you want to save money on the services of experienced professionals, you must remember that such work must be done very carefully and not in a hurry, especially if you are doing this for the first time.Recessed spotlights are popular in the design and installation of lighting for suspended ceilings. Such lamps allow you to create the required indicator of the illumination of the room, and provide an attractive modern look of the ceiling.
How to choose a lamp
Typically, lamps designed for built-in fixtures, in power, lie in the range from thirty to one hundred and fifty watts. The housings of such lamps can be made of materials such as plastic, glass, metal or glass. The standard types of such lamps are equipped with electrical boxes located a short distance from the glass flasks, because during operation such lamps heat up quite a lot. And this must be taken into account when installing lamps, they can not be installed nearby with flammable elements and materials. Optimal if there is a gap of two centimeters.
Well, now about the design of such lighting devices, everything is subject to you and your imagination. There is a diverse array of different sizes and configurations of spotlights. Here you can find luminaires that are deeply recessed into the casing by configuration, there are also mobile versions of luminaires and spotlights that have rotary devices that allow you to provide directional streams of light to certain areas. When choosing this type of fixtures, consider the design and external indicators of your ceiling, and the style of the selected zone or room.
Instruments
To complete the installation of recessed fixtures with your own hands, you need to have a junction box, and in accordance with the plan the required number of spotlights, you will need an electric cable (usually it comes with such lighting equipment).
Since we have to deal with electricity when installing fixtures, we must have protective caps and electrical tape for wires, we need a tester. You may need a drill with a long drill and a special nozzle on the drill to get holes. It is worth for these works to acquire pliers or crimping pliers, a screwdriver and nippers. Safety glasses that protect your eyes from injuries and damage will not be out of place..
Do-it-yourself installation of recessed fixtures
Before the installation procedure, you must de-energize the room, make sure that you have done this and there is no current, using a tester. Next, determine on the surface of the ceiling the places where the lamps will be located, markings, performed with a pencil.
Then you should protect your eyes with pre-prepared glasses from dust and construction debris. Having taken a drill, on which a round nozzle was previously installed, make the necessary holes in the ceiling, while the diameter of the hole should coincide with the diameter of the housing of our selected spotlight. Then we bring electricity. To do this, pull the cable between the junction box of our lamp and a source of electricity. The cable cannot be cut end-to-end; you must leave a margin of at least thirty centimeters, optimally fifty centimeters. All work is done very carefully, and in order not to unnecessarily expand our hole, use a long drill.
The connection of the extended cable with the existing junction box in the luminaire is performed using wire cutters while removing insulation from the ends of the cable. Connect the wires protruding from the junction box, with cable stripped wires twisting them. At the same time, monitor the correspondence of colors, white wires are interconnected, do the same with black wires. Further, these wires must be crimped using pliers and closed with a special protective cap. Then we pack the wiring in a box, after that it is closed with a lid.
In the hole prepared on the ceiling surface, we install the lamp housing. With clips, usually four of them, we fix our lamp design. These clip automatically snap.
Finally it’s time to complete the installation of the bulbs. On the housing of all bulbs there are hooks or spring-type cylindrical elements that are quite simply fixed in the housing. Well, here all the work is finished, and we can admire our ceiling. But we check the performance of our design by connecting electricity, and use the results of our work. As you can see, doing your own repair work is not at all difficult, and there is nothing complicated in the installation of lamps, the main thing is to correctly and accurately markup.