Waterproofing the floor of the bath
Waterproofing the bath floor is a necessary procedure. If it is not carried out, excess moisture can not only damage the decoration of the room, but also cause the destruction of the structural elements of the building. Therefore, you need to think about the waterproofing of bath floors at the planning stage of construction. It is important to ensure fast water drainage from the steam room, showers and other rooms. And also – treat the floors with traditional or penetrating waterproofing coatings. You will learn about all these technologies from our article..
Content
- Types of waterproofing materials
- Features of processing a wooden floor
- Completely waterproof floor
- Making a floor with a drain pit under it
- Tricks for working with a concrete base
Types of waterproofing materials
Waterproofing floor in the bath can be traditional or penetrating.
Traditional waterproofing is:
1. Smear. It is represented by dozens of types of mastics, dry mixes, pastes, differing in cost, composition, scope, specifics of styling, drying speed.
- bitumen-polymer, as well as bitumen mastics, which consist of oxidized bitumen with synthetic additives, are inexpensive, but for them you need to additionally equip a concrete screed. Usually, coating waterproofing is used under tiles;
- cement-polymer mastics are universal, when applied in layers when using special. reinforcing mesh, they simultaneously perform the functions of waterproofing and screed. True, they harden for a rather long time – about 4 days;
- similar characteristics of one-component cement mixtures with organic additives;
- polymer liquid mastics are drying speed champions; in consistency they resemble paint.
The common disadvantage of coating mastics is the higher price than rolled analogs, and the general plus is the exceptional waterproof performance. They can be applied to almost any surface..
2. Glued. Nakleechnaya roll waterproofing is suitable for repair of economy class. This coating is a special flexible base made of polyester, fiberglass and fiberglass, with bitumen applied on both sides. It can be self-adhesive (one side of this sheet is coated with a special adhesive composition), as well as fused (before laying, the wrong side of the sheet is heated with a burner). The main advantages of this material are low cost, extreme ease of installation: you just need to cut one piece of a certain length from the roll, and then stick it to the floor. The disadvantages include the sharp smell of bitumen, which will remain for some time after the repair is completed, and the need for high-quality preparation of the base.

Adhesive traditional waterproofing is the most affordable material, the installation of which is easy for an inexperienced performer
Traditional waterproofing will provide a strong, reliable waterproof layer, but it reduces the height of the bath room by 5 cm.
Penetrating waterproofing can be:
1. Concreting. Differs in density and frost resistance. Commonly used for waterproof concrete structures..
2. Polymer cement. Differs in environmental friendliness, durability, high level of coupling.
3. Inorganic cement. It is used in rooms with extremely high humidity, also under tiles..
4. Seamless. It is considered the most effective type of waterproofing. Its use is permissible in any room..
If finances allow, then for floors in the bath it is better to use one of the varieties of penetrating waterproofing.
Features of processing a wooden floor
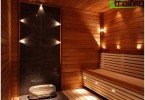
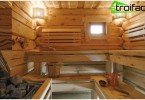
For a bath, the most suitable floor is, of course, wooden. Wood material has a pleasant appearance, has healing properties. Such a floor can be made of spruce, pine, fir or larch. But it is better to choose conifer trees for these purposes. They have a resin, thanks to which the floor will last much longer. Also, coniferous flooring will not slip when wet, unlike, for example, oak. Waterproofing a wooden floor should be carried out using special technologies, which we will discuss later.
First of all, you need to decide how to get rid of the water in the bath. This is a necessary stage, which necessarily includes the technology of waterproofing the bath floor. And you can do this in different ways. At the initial stage, you need to decide whether you will install a leaking or non-leaking wooden floor, and how you will do it.
The logical question is: what to choose, how do these coatings differ? The main difference between them is that the first (leaking floor) suggests that there will be gaps in its coating through which water will go into the ground. And the second (non-leaking analogue) contains a specially designed ladder through which liquid enters the pit and only then goes out of the drain pipe. Details on how to construct them will be described below..
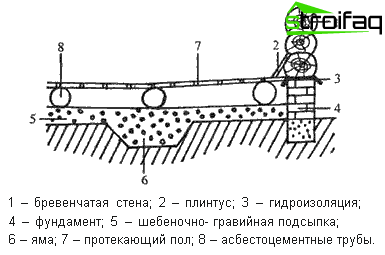
Completely waterproof floor
This design is built by deepening the lag into the clay or concrete layer, on top of which the boards are covered. A traditional floor screed device is used. However, its surface is made with a slope using a water level. The bias is done in the 1st direction or towards the middle. Then, in the lowest place on the surface of the floor, a recess is made to drain the water and a grate is installed on it. Then the water is diverted to the sump / connected to the sewer.
Thus, the water collected on the bathing wooden floor will drain to the designated place and then will be removed from the room. This is the easiest and often applicable way to protect the floor in the bath from water. However, it has a fundamental flaw: the boards never completely dry, so they can begin to rot. And the non-leaking bath floors will always be cold.

Non-leaking wooden floor
Making a floor with a drain pit under it
This design is already more complicated. Mounted by the following technology:
1. A layer of gravel and sand is laid on the ground
2. Then this layer is poured with concrete
3. Make a recess and direct to the 1st of the walls in the form of a kind of gentle funnel
4. Into the funnel, insert the container needed to collect water. It should be airtight (can be made of concrete ring or brick)
Important: First, a receiver for collecting water is installed in the bath floor, and only then the base itself is laid. It turns out a kind of waterproofing the floor of the bath.
5. Planks are laid on top, making a gap of 5-6 mm
6. Next, you need to waterproof the columns, which are the basis for the log. They can be made of brick (25×25 cm) or on a concrete / sand cushion.
7. When the drainage system for water removal is ready, and the foundation for the furnace is prepared, you can proceed with the installation of the floor in the steam room and washing.
It is necessary to apply waterproofing after all these works. Its choice will depend on the wood material used. For each, there are different types of traditional or penetrating mastics..
Leaking wooden floor in the bathhouse
Tricks for working with a concrete base
Preparatory stage
1. You need to wait until the concrete has set, gets stronger and dries.
2. Then a cement-sand screed of 15-20 mm thick is applied to the concrete surface
3. On a concrete surface irregularities, dents, pits and tubercles are not permissible. You also need to remove all oily stains, traces of paint
4. By level, prepared screed waterproofing.
Waterproofing
Traditional waterproofing (mastic) is always applied in several layers. After they put on it a special rolled waterproofing material. Finishing material is already laid on top of it..
Penetrating waterproofing it is applied on top very easily and simply. The main thing is that a preliminary preparation of a concrete floor is carried out beforehand.
As you can see, these technologies are simple. Anyone can carry them out with a certain preparation.