Choosing a tile, we usually already imagine the end result: a shiny smooth surface formed by impeccably even rows of tile. It seems to us that it will not be possible to achieve such a result on our own, therefore we invite workers to perform the facing. But the services of specialists are not cheap, and there is no need to talk about a guarantee of perfect execution. But what if you delve into the process, study the available information, view a video tutorial on the topic? – Then it turns out that laying tiles with your own hands is quite possible: you just have to stock up with the necessary knowledge on the topic, collect the necessary materials, tools and, of course, properly prepare the surface. Let’s consider in more detail.
Content
- Choose materials
- We will collect the necessary tools
- We will carry out preparatory work
- Tile Laying Technology
- Finishing – grouting
Choose materials
To avoid unpleasant surprises during the upcoming installation, pay due attention to the choice of tiles. In addition to the beautiful appearance of the tile, something else is required from the tile: it must meet the conditions in which it will be operated. Pay attention to the marking of the tile, which is applied on the packaging. First of all, for its purpose, floor tiles should be laid on the floor, and wall tiles, respectively, on the walls. In addition, each type of tile has a different strength, porosity, abrasion resistance and even frost resistance, it is very important when choosing a tile to know and remember about it. Another important point – high-quality tiles must have the correct geometric shape, pay attention to the angles, plane and integrity of the edges.
When buying a tile, take a square with you, or use a very simple way to check the geometry of the tile: just fold a few tiles with the front side, while all the corners of a high-quality tile coincide and the surfaces adhere to one another across the entire plane. To determine the required number of tiles, decorative elements, glue and other consumables, it is necessary to measure the surfaces to be trimmed and make a plan tile layouts, taking into account the desired pattern.
Tip. Buying tiles do not save: take it with a small margin, it will be good if you agree with the seller about the possible return of surplus.
When choosing tile glue, give preference to glue with a longer setting time, so you will have the opportunity to adjust the position of previously laid tiles.
We will collect the necessary tools
- Glue container.
- Drill Mixer.
- Measuring tools (tape measure, ruler).
- Spatulas (plain and notched).
- Master OK.
- Rubber mallet.
- Tile cutter.
- Plumb.
- Level.
- Water level (transparent tube filled with water).
- The rule.
- Fishing line.
- Plastic crosses for gaps.
We will carry out preparatory work
The most important point in laying tiles is preparing the surface, whether it is a floor or a wall – the surface should be perfectly flat. It is better to spend more time on high-quality plastering of walls and floor screed than subsequently correcting irregularities with the thickness of a layer of tile adhesive. If the surface is flat, then laying the tiles with your own hands will not be much more difficult than folding children’s puzzles.
You must pre-mark the wall or floor, if you plan to lay tiles with a pattern, then you need to make an arrangement of tiles and decor elements, first on paper and then on the work surface (the so-called tile layout plan). If the surface for laying is uneven, then you will need to correct the situation by applying more or less tile adhesive to the tile. During installation, it is necessary to install beacons in the corners, from which, according to the plumb line and level, pull the fishing line, it will have to control the evenness of the masonry. It is much easier to lay tiles on carefully leveled surfaces..
Tile Laying Technology
Ways of laying tiles can be different: row in row, sideways and diagonally. When laying on a wall in a row in a row, vertical seams are checked by plumb line, and horizontal – by level. Overshoot – when in the upper row tiles are joined in the center of the tiles of the lower row. Diagonal masonry is more complicated, so beginners should not take it.
The most common method of laying tiles “row in row”
So let’s get started. First, prime the surface and let it dry completely, as indicated in the instructions for use of the primer. Priming the surface is necessary not only to improve adhesion of the adhesive, many modern primers have components that prevent the development of mold and fungi. The tile before cladding must first be immersed in water for about five minutes, so that then it does not absorb water from the adhesive.
After this, you can begin to prepare tile glue, for which a glue mixture is gradually poured into a container of water and at the same time we mix it with an electric mixer. Make sure that there are no lumps or glue left in the corners of the dishes.
Do not immediately cook too much glue so that it does not become worthless, determine the amount of batch empirically, depending on the speed of your work.
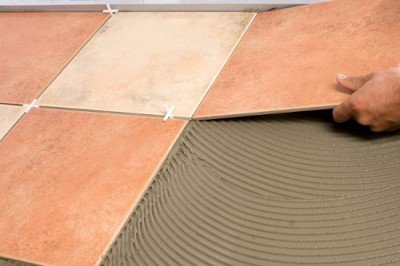
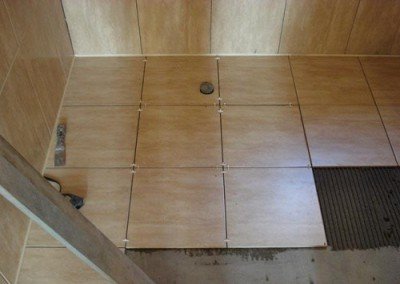
When tiled throughout the room, the walls are first lined, and then the floor. Laying tiles on the wall begins from any lower corner, and on the floor – from the far corner. Using a trowel or a spatula, we put the adhesive mixture on the tile or on the surface to be coated, it’s more convenient for anyone (the author of this article is more comfortable when applying the adhesive to the tile on the wall, and on the floor screed when facing the floor). We remove the excess with a trowel, when applying glue to the tiles, carefully wipe the edges.
The seams between the tiles are made using plastic crosses.
We apply the tile to the surface, press and align, tapping on it with your hand. You can gently tap with a rubber mallet, but when working with wall tiles there is a great risk of breaking it, the floor tile is more durable. The correct installation of each tile is constantly checked by the level and rule. After gluing the first tile, we proceed to laying the second in a similar way. The seams between the tiles are made using plastic crosses, which exist in several sizes, the larger the size of the tile, the more seams should be between them..
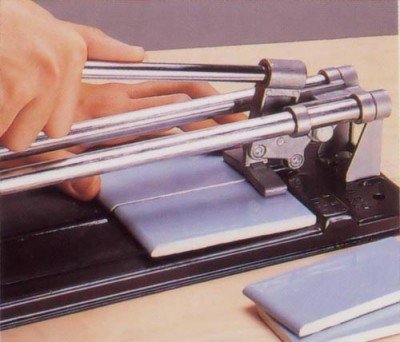
For cutting tiles, it is better to use a tile cutter.
In this way, all whole tiles are laid out, but when laying the extreme tiles they will need to be trimmed, you can do this in several ways, with a tile cutter or in the absence of it with a conventional glass cutter. This happens as follows: on the enameled surface of the tile, a marker draws a line at the place of the cut, along which the enamel is scratched with a glass cutter. After that, the tile is placed on the table with enamel up, just like a scratch, a nail is placed under the tile and, pressing on both sides of the tile, break it.
The thinner the strip you want to cut, the harder it is to do, in this case, the strip can be broken off with ticks. As a rule, there are no difficulties with trimming wall tiles, but cutting the floor is much more difficult. Floor tiles need to be cut with a tile cutter or grinder with a stone disc due to its high density.

Tile drilling fixture
If you want to make a hole, the tile can be drilled, holes of large diameter are made using a special device. In the process, it is important to monitor the evenness of the laying of each row, if necessary, make timely adjustments to the location of the tiles before setting the glue.
Finishing – grouting
Grouting inter-tile seams is the final and easiest step in facing, but do not underestimate it, since a high-quality seal can hide some flaws in the laying of tiles, and inaccurate – only spoil all the work done before. The color of grouts can be different, and its choice depends on the color of the tile and the preference of the owner. You can use grout in the color of the tile, or you can use contrasting – you decide.
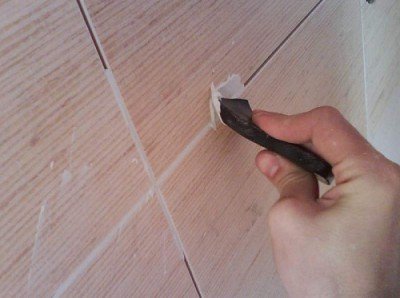
Tile grouting
Before closing the joints, it is necessary to remove the crosses remaining in them for gaps, to clean from dust and glue residues. You can start the embedment a day after laying the last tile. To do this, you need a trowel mixture, a container for its dilution and a small rubber spatula. Dilute the dry grout mixture with water to the required consistency, hold for 5-10 minutes and mix again. With the mass obtained in this way, we fill the inter-tile joints, align them with a rubber spatula and remove the excess grout. The seam should be smooth, without pits and tears. When the grout is slightly set, wipe the tile with a clean cotton cloth from the rest of the mixture. As a rule, many grout mixtures acquire the final water resistance in five days, therefore it is advisable to operate the lined surface after this time.