How to make a wooden floor in the bathroom
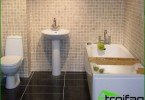
A snow-white bathtub on an elegant parquet … This is not a picture from the life of French aristocrats of the 18th century, it is a stylish interior of the 21st century with high technologies and creative design ideas. Skeptics will say that this is nonsense: after all, there is ceramic tile, porcelain tile, marble, finally. Only the wooden floor in the bathroom creates in it a special “trusting” atmosphere of warmth and comfort. Wood is a “living” natural material, it is more pleasant to feel it under bare feet than a cold tile. The tree on the bathroom floor goes well with different interior styles, but it is especially harmonious in a wooden house.
Content
- Wood flooring in the bathroom
- Teak, natural properties
- Why larch is suitable
- Advantages and purpose of the thermal tree
- Moisture resistant laminate as an alternative
Wood flooring in the bathroom
Wood, as a natural material, cannot but respond to frequent changes in temperature and humidity by such unpleasant processes as:
- Decay;
- Defeat by fungal and mold organisms;
- Change in linear size, swelling, bloating due to moisture.
At the same time, wood has long served as the main material for the manufacture of fishing boats and medieval sailboats; it is also widely represented in modern shipbuilding, coping well with aggressive water elements. Not all wood species are suitable as a floor covering for a bathroom, but only a few of its species, the best properties of which have been verified by the centuries-old experience of mankind.
Teak, natural properties
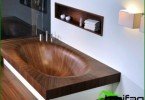
This is an ideal natural material for the floor in the bathroom, it is from it that the decks on cruise ships and yachts are laid. Teak wood has a very high content of essential oils and resins, it is waterproof and does not react at all to changes in humidity, but most importantly, the teak does not rot!

Teak – ideal for the bathroom floor, it does not rot, it is not affected by fungus, mold and insects
With proper sealing of joints at the joints of teak boards, the floor in the bathroom will become as waterproof as the ship deck.
Why larch is suitable
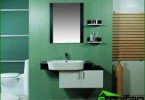
It is endowed with all the best properties of teak and is superbly “friendly” with water. Due to the affordable price, larch rightfully claims to be the favorite as a floor covering for domestic bathrooms.
Advantages and purpose of the thermal tree
Recently appeared on the domestic market of building materials and expanded the “circle of selected” waterproof species of wood. This is wood treated with hot steam at t = 220-240 ° C under pressure, without oxygen.
The result is a solid solid material that is resistant to decay and damage by fungal and mold bacteria. The moisture absorption of thermal wood is 5 times lower compared to ordinary untreated wood, and the change in linear dimensions and the degree of swelling are tens of times lower.
Moisture resistant laminate as an alternative
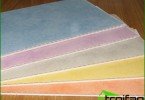
A worthy alternative to natural wood for flooring in the bathroom. This material, the surface of which usually mimics valuable wood species, is widely used in shipbuilding. When buying, in order not to confuse a moisture-resistant laminate with a high-quality analog of the highest strength class, you should pay attention to the marking “for rooms with high humidity”.
Mandatory waterproofing and ventilation
For the installation of a wooden floor in the bathroom, pouring screeds of sand and cement is not required, it is laid on a waterproofing layer laid on top of any base. In a wooden house – this is any rough floor on the logs in which the pipe system is hidden. For waterproofing wood floor you can use ordinary ruberoid or special adhesive insulation, which is applied on top of several layers of moisture-insulating material and is treated with a special tool at high temperature, fusing the base and layers.

For waterproofing a wooden floor, an ordinary ruberoid or a special glued waterproofing is suitable
The second necessary condition for ensuring the durability of the wooden floor is to ensure effective ventilation in the bathroom, which will remove water vapor from the room and quickly dry the floor and walls. The performance of the exhaust system is selected in accordance with the area and intensity of use of the bathroom.
And finally, in order not to expose the waterproofing to unnecessary loads, a ladder is required to quickly remove water in the event of a “flood”. For this purpose, the floor is made with a slight slope of about 1.5% and a ladder with a hydraulic lock is installed at the lowest point, in the center or in the corner, which will quickly bring water to the sewer system to the floor.
Making a wooden floor in the bathroom
Boards designed for the floor in the bathroom, suppose this is a parquet board, for acclimatization should be stored for at least a week in a warm room to ensure the stability of their linear dimensions and to exclude possible deformation of the finished floor.
If the floor is not laid in a new house, they dismantle and take out all the bathroom fixtures: bathtub, sinks, toilet bowl.
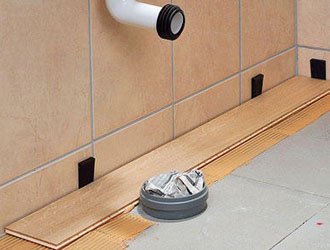
On the previously prepared base of the floor, under which the necessary plumbing and electrical communications have already been laid, lay waterproofing and mark the points of the holes for the output of communications. The holes for convenient fitting of the boards make a little more than the diameter of the pipes, since the floor boards should not be in contact with them. During operation, the pipes are closed with special plugs.

The holes of the holes for the output of communications are marked on a previously prepared floor base
Boards are laid out and stacked, starting from the doorway, while without an adhesive. The stage of pre-fitting boards is required. When laying on glue, there is no time for trimming: the composition dries too quickly. The best long boards without visible defects are laid in places where the inhabitants of the house will walk most and where they are in plain sight. Scraps and boards with small flaws come in handy when laying under the sink, near the toilet and in other inconspicuous places.
Having finished with the markup and open the boards, proceed to their laying on the glue. The underside of each board is covered with a layer of acrylic varnish, and a layer of adhesive is applied to the floor base with a comb spatula.
Each next row of boards is laid only after the previous one dries well
When installing boards, use pegs that provide the necessary temperature seam, which will prevent the wooden floor from deformation when used in a damp environment. Each next row is stacked only after the previous one dries well, finishing each board from the end for better operation of the locks.
Having laid all the boards, all the holes, corners and the joints with the walls are filled with a sealing silicone compound. You can also use special wax putty sticks for this purpose, which provide an elastic seam without shifting the board.
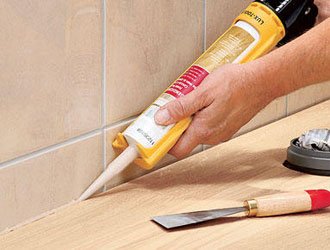
Having laid all the boards, all the holes, corners and joints of the walls are filled with a sealing silicone compound
At the end, the finished floor is ground with a grinder and several layers of acrylic varnish are applied with a rigid brush. This is a reliable waterproof coating, which in case of damage or wear is easily restored only in the damaged area. That is, a complete repair of the entire floor is not required.

The finished floor is ground and several layers of acrylic varnish are applied with a hard brush
At first glance, a non-standard creative idea turned out to be an easily solved problem. Pleasant in appearance and to the touch, a perfectly even wooden spectacular floor in your bathroom will now easily tolerate temperature changes and high humidity. Of course, subject to properly executed waterproofing.