Do-it-yourself wiring in the garage
For the vast majority of the strong half of our country, a garage is not just a place to store a car, but also a workshop, utility room, a warehouse of tools, spare parts and other equipment. Therefore, good lighting is often not a luxury, but a necessity. The average “electronic set” of each garage consists of several lighting devices located in different zones and powered by their switches, illumination of the inspection pit and basement, as well as a couple of three outlets that provide power to several power consumers. Putting electricity into the garage is not a very complicated process. Therefore, the electrical wiring in the garage with your own hands will not surprise anyone, in order to properly carry out its installation, enough elementary skills in working with electricity.
Content
- The nuances of installing electrical wiring in the garage
- Wiring diagram development
- Electric tools and equipment
- Installation of garage wiring
- Outdoor unit
- Internal wiring
The nuances of installing electrical wiring in the garage
As a rule, rarely in the garage is anyone except his owner, therefore, in the first place with electrical wiring such qualities as functionality and safety come out, but the aesthetic component goes by the wayside, if not the third. You can argue, but what about hidden electrical wiring in the garage? Secrecy is not a requirement of aesthetics, but rather a requirement of security, since cables held inside the walls, when hidden, are reliably protected from various mechanical damages. Of course, if the walls of the garage are made of sheet iron, then there can be no talk of any concealment in the walls, but in this case there are various metal sleeves, corrugated pipes and other ducts that can reduce the risk of external effects on the wires.
To increase the safety of working with electrical devices, it is recommended to install a separate grounding device at the input to the switchboard. The simplest version of grounding: metal rods with a diameter of 15-16 mm, vertically dug into the ground and interconnected by a steel strip. The resistance of such a device should not exceed 4 ohms.
Since the garage, due to dampness and conductive walls, is considered a high-risk building, all attributes (sockets, lamps and switches) should have a high protection class against dust and moisture, ideally IP44.

Sometimes a garage turns into a real workshop
If you plan to create a real workshop in the garage, you need to take care of the three-phase input in advance. In this case, you will need a cable with copper conductors and with a cross-sectional area of 5-10 sq. Mm., And a shield designed for at least 18 modules. But this is not the main thing …
The main thing is that before carrying out a three-phase power supply system, it is necessary to obtain a permit and technical conditions at the local Energy Sales, each point of which will need to be precisely observed.
Wiring diagram development
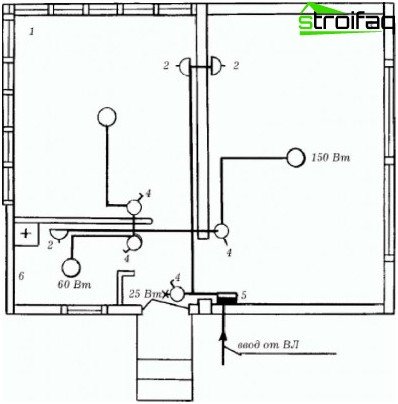
In order not to make a mistake during installation and to do everything right, you need a wiring diagram in the garage – a plan that details all the locations of sockets, switches, electrical cables, etc. The basic rules of this process:
- On the diagram, it is necessary to extremely accurately note all the locations of lighting devices, boxes, switches and sockets.
- Elements are interconnected exclusively by straight lines located at right angles to each other. In this case, the connection starts from the switchboard.
- It should be noted how to connect each element. Probably everyone remembers that the circuit breakers with the lamp are connected only in series, and the outlet must be located in front of the switch.
- It should be noted that the distance from the wires to the ceiling should be at least 100 mm, from the outlet to the floor at least 500 mm, and the general switch is located on the right side of the gate at a height of 1500 mm.
Example wiring diagram in a garage
Further, the wiring diagram in the garage is transferred to the walls. Fine, even lines can easily be applied with a long cord dipped in dye..
Electric tools and equipment
The next step is to prepare everything that a person who needs to think about how to conduct wiring in the garage may need. So, you will definitely need the following equipment:
- hammer, chisel, screwdrivers, side cutters and pliers with insulated handles;
- drill and several drills;
- insulation tape and plaster;
- hammer drill (in case the walls of the garage are concrete);
- hardware (dowels, screws, screws);
- electrical appliances (you can do with a screwdriver indicator).
The main element of power supply is an electric cable. Cables with copper conductors have proven themselves best, but aluminum products can also be used, although their conductive properties are somewhat lower. In addition, it is necessary to purchase corrugated pipes, mounting and installation boxes, sockets, lighting devices, adapters, step-down transformers and switches.
Installation of garage wiring
The electrification of the garage can be divided into two stages:
- installation of external wiring (from power lines to the entrance to the room);
- internal wiring in the garage.
If the internal wiring in the garage with your own hands is most often mounted, then the external work must be carried out by a qualified electrician who has access to work with high-voltage lines.
Important: before supplying electricity to the garage, the project must be agreed with the local Energy Supervision Authority.
Let’s consider in more detail how to make wiring in the garage both outside and inside.
Outdoor unit
There are two ways to transfer electricity from an electric pole to a building: air and underground. When choosing, they are usually guided by such factors as the relative position of the garage with other objects. If the garage is located at a distance greater than 25 m from the power line, the installation of additional posts will be necessary to lay the cable through the air. In this case, the height of the wire should be:
- near the building – more than 2.75 m;
- above pedestrian paths – more than 3.75 m;
- over the road – more than 6 m.
The air line is entered through the wall at a height of at least 2.75 m. For this, insulators are mounted on special hooks outside the garage so that the distance between the cables is more than 0.2 m.
Tip: drill holes in the wall for the entry of wires should be inclined outward. This will prevent water from entering it..
Before entering the garage, the wires must be insulated with plastic or rubber tubes, and after that all the cracks should be carefully cemented or sealed with alabaster.
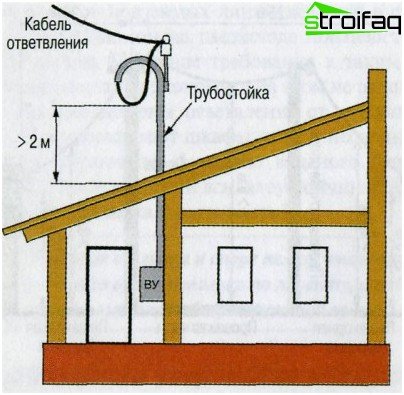
The correct input of electricity to a low garage is carried out using a pipe stand
Some owners of low garages have a reasonable question, how to make wiring in the garage, if its height does not exceed 2.75 m? How to get permission from Energy Supervision for such a project? Is it really necessary to do without electricity in this case? Well of course not. Simply, in this case, it will be necessary to install the so-called pipe rack – a steel pipe, in which the upper end is bent by 180 ° and equipped with receiving insulators. Such a device makes it possible to introduce electrical wires even through the roof. Fastens pipe to roof rafters.
A few words need to be said about the underground method of electrifying a garage. In this case, the cable is located in the ground and protected by a steel box. Wires are introduced into the garage through a prepared hole in the foundation. The cable passing through the entry point is necessarily protected by a pipe, in addition, a separate hole is prepared for each wire.
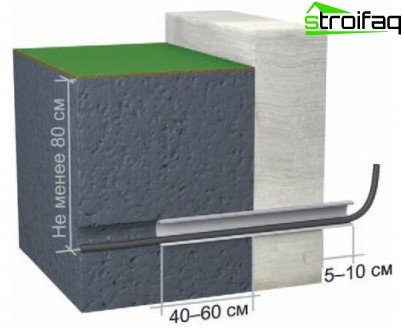
Correct entry of cable into the garage through the foundation
At the end of the work, the electrician installing the wiring externally must route the cables to the input box with an electric meter and fuses. And then, if a decision is made on independent conduct lighting inside the garage, the boss comes into action.
Internal wiring
Internal wiring may be open, or may be hidden. As mentioned above, in metal and wooden structures it is very difficult to carry out hidden installation, therefore, for such garages an open method is relevant. In this case, the cables are mounted in skirting boards or special metal or plastic boxes. Flat wires (e.g. APPV, PPV, APPR), as well as unarmoured protected cables are more effective for open wiring.
Wires on the walls are fixed with tin brackets, nails or dowels at a distance of not more than 0.4 m. Wiring must be carried out horizontally, 20 cm from the ceiling, and the boxes are glued or screwed.
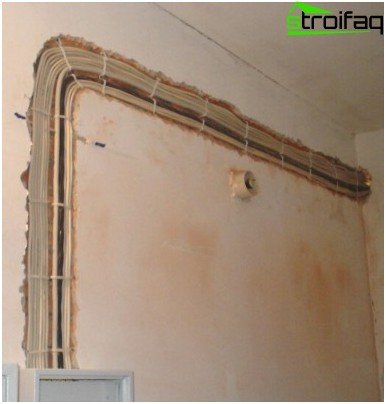
When conducting hidden wiring, it must be ensured that it is laid so that there are no protruding areas after plastering
In brick and stone buildings, hidden wiring is more popular. It is best to carry out all the work before plastering the walls, in this case, you need to monitor only the proper installation of the equipment, that is, so that after plastering, for example, the edges of the junction boxes do not look out. If, nevertheless, electrification is carried out after applying the plaster, then it will be necessary to cut out shallow grooves in the walls (5-6 mm – more than enough), which, after laying wires in them and fixing them with nails, are carefully sealed.
Important: the main feature of flush mounting is the need to solder the connected ends of the wire. This will avoid their oxidation and unwinding. After this, the junction, as usual, is fixed with electrical tape.
Pit and basement lighting
No car owner who has his own garage can do without a viewing hole. And the basement can rightfully be called a mandatory attribute of any garage. Neither there, nor without lighting devices can not do. It would seem that you can connect portable lighting, but both the viewing hole and the cellar in the garage are usually characterized by high humidity and are considered hazardous areas. That is why the voltage in these places should not exceed 42 volts, which means that a small step-down transformer will be needed for wiring.

Lighting in the inspection hole must be low voltage
Naturally, when installing step-down equipment, you should purchase lamps and electric tools designed for such a small voltage.
Important: working in the basement of the garage or in the inspection pit using conventional electrical equipment is life threatening.
Safety Rules
That is why for some reason I have confidence that having decided to independently conduct electricity to your garage, rarely anyone … But what is there to be modest, most likely, no one will look into the safety requirements. Well, we don’t like to read such serious books. Therefore, the article will be incomplete without some key points of this extremely important section..
So, let’s begin:
- Any work on repairing and replacing wiring, conducting electricity to the room, and even replacing sockets and bulbs, is possible only with a complete absence of voltage. To do this, you can unscrew the simple plugs, if they are still installed, or turn off the plugs and vending machines in the distribution panel of the apartment.
- Clothing and shoes should be comfortable, not obstructing movement..
- The entire power tool should be intact, without bare wires and low-quality connections;
- An ordinary tool should not only be intact, but also with insulated handles.
- To perform work at height, special platforms or goats should be used, not barrels, foam blocks, chairs on tables and other favorite designs.
- Most importantly, do not rush, do not forget about your safety.
And finally, take full responsibility for this matter. After all, the correct installation of the wiring guarantees its operation for 30 years. Any wrong step, banal laziness (for example, neglecting the soldering of wires) can damage the entire electrical network, and with hidden installation, entail heavy repairs. Therefore, if you have any doubts about yourself, invite real electricians who can quickly and effortlessly cope with the installation of wiring in the garage.


