How to overwrite seams on a tile
The final stage of laying tiles on walls or floors is grouting – filling the joints with a specially prepared compound, the color of which can match the color of the lined surface or, conversely, be contrasting. If necessary, the treated seams are also treated with sealant. In addition to the decorative function, the grout protects the seams from moisture and can hide possible masonry defects, but poorly executed can ruin the appearance of a perfect tile. Tips on how to grout joints on tiles correctly will help prevent mistakes and extend the life of a beautiful and durable ceramic floor or wall covering in any room of your house.
Content
- Range of grouting materials
- Seam Width – Selection Factor
- How to overwrite: recommendations and tips
- Cooking Grout Paste
- Grouting
- Using a grout bag
- Dry trowel cleaning
- Wet final cleaning
Range of grouting materials
To finish the seams at the joints of the laid ceramic tiles, special grout mixtures are used, which, depending on the binder included in the composition, are:
- cement-based grouts;
- two-component epoxy grouts.
Cement grout for tile joints is sold in the form of a dry mixture, which must be brought to the required consistency with water or liquid latex before use. The basis of mixtures of this type is Portland cement, and as additives, hardeners, dry latex and coloring pigments can be included in the composition. If you can’t find the finished grout of the desired color, you can buy white and add your own dye before use.
The basis of epoxy grouts are two components – epoxy resin and hardener, providing high strength joints and resistance to both moisture and aggressive chemicals. Epoxy grout is quite viscous and hardens very quickly, you need to work with it skillfully and quickly. In addition, for the decoration of residential premises, ceramic tile is most often used, the thickness of which does not exceed 12 mm, and the width of the joints at the joints is 3-6 mm, and such narrow joints, viscous epoxy grout simply can not fill, but when facing home pools or other non-standard objects it is irreplaceable.
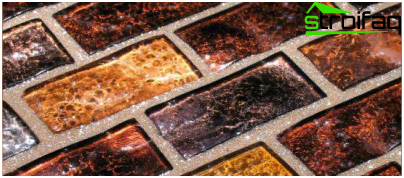
Epoxy grout is good for wide joints and enhances the decorative effect of unusual tiles.
It’s important to know!
When choosing an epoxy grout for a tile, do not confuse it with a sealant based on elastomers, the packaging of which usually indicates that they are designed for tile work. Sealers are used to fill probable voids between the tile and the base when laying, but they are not suitable for filling the seams.
Seam Width – Selection Factor
Everyone chooses the width of the seams between the tiles to their liking, but the surfaces lined with square or rectangular ceramic ceramics of any standard size from 10 to 60 cm look more aesthetically pleasing and accurate with a joint width of 3 mm. Too wide seams in this case visually depress slightly and simplify the elegant design of the ceramic surface.
When using irregularly shaped tiles, a wider seam up to 12 mm, in contrast, enhances the decorative effect of the lined surface. But a wide seam can crack during operation and even the addition of coarse sand, recommended in such cases, does not exclude the likelihood of an unpleasant lining defect.
Too narrow seams with a width of less than 3 mm can also crack if a grout mixture is used with a too liquid consistency or, conversely, a thick grout does not fill the entire space of the seam and water penetrates the lining through the voids. In addition, the seam also serves as a shock absorber, which protects the lining from destruction during their possible expansion or compression of the tiles with temperature changes, and with a width of 1-2 mm, it loses this ability.
The width of the joints 3-12 mm is considered optimal, also because it allows you to use, if necessary, not only the simplest cement grout diluted with water, but also latex, acrylic or epoxy grout.
How to overwrite: recommendations and tips
Like other finishing works, grouting of ceramic tiles begins with a thorough cleaning of the lined surface and the removal of dividing crosses.
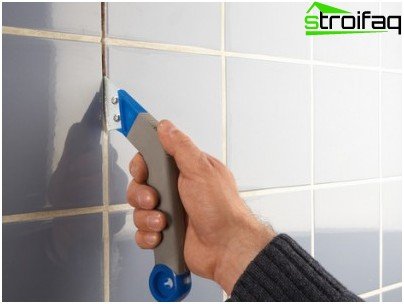
Before grouting the tiles and seams must be thoroughly cleaned.
Important to remember!
If the dividing crosses are not removed, the layer of the grout on them will be thinner than on the layer of the binder solution, and therefore its color after solidification will differ and the lining will look untidy.
When working with glazed tiles, you can overwrite dry, well-cured joints. Cladding of unglazed ceramics should first be moistened at the joints: this will prevent the intensive absorption of moisture from the grout. You can moisten the tile from the sprayer, but in moderation. If trickles of water flow off the tile onto a fresh grout, it may become too liquid and crack after drying.
Cement and epoxy, which are part of the grout, can cause inflammation of the mucous membranes and allergic reactions, so when working with these materials it is recommended to use protective glasses, a respirator and rubber gloves. Tile grouting involves the following steps:
- preparation of grout paste;
- applying grout to the seams;
- dry cleaning of joints;
- wet final cleaning of joints.
Cooking Grout Paste
The dry component of the cement-based grout and, if necessary, the dry pigment is poured into a spacious clean container, the amount of water indicated in the manufacturer’s instructions is poured and mixed first manually and then mechanically using a construction mixer.
The result should be a solution with a consistency of very thick sour cream. If the mixture is too thick, adding water, bring it to the optimal consistency. If you use liquid dye to tint grout, add it to the finished paste and mix well with a mixer. The prepared solution for the complete swelling of the constituent components is left for 10-15 minutes and again mixed with a mixer until a uniform smooth consistency.
Grouting
The trowel paste is applied to the tiled surface and evenly distributed with a wooden trowel or trowel in the direction of the butt joints between the tiles, carefully filling them with a mixture.
The tool should be kept at an angle of 30 ° to the tile, and the mixture should be applied with diagonal movements. The grout with pressure is pressed into the seam, filling to the top all the corners, voids, cracks that are not filled with glue. During grouting, the liquid fraction of the paste will gradually come to the surface, and the seams will be filled with a solid fraction of cement, sand and polymer additives.
Do not immediately apply grout paste to the entire surface to be treated. Rubbing the seams on an area of about 1 sq. M, determine how quickly the grout is set, and then decide at what frequency it is necessary to stop and clean already treated areas.
Using a grout bag
When working with a surface lined with hard-to-clean tiles, for example, made of natural or artificial stone imitating it, grouting can be done using a special grout bag with a tip, like a pastry bag.
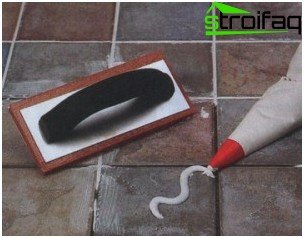
It is convenient to apply grout to the seams of the matte tile with a special bag.
Filling the seam with paste from the bag starts from the top and, as each seam is filled, go down to the bottom. At the same time, grout should be squeezed out a little more than the required amount. As soon as the mixture begins to set, use a piece of rubber cable with a diameter greater than the width of the seam to gently push it into the seam, and after about 30 minutes, excess grout pressed into the seam can be removed with a stiff brush.
Dry trowel cleaning
Having filled all the joints with grout mixture, its excess from the tile is removed with a special grater, holding the tool almost perpendicular to the tile and moving diagonally in the direction of the joints, being careful not to touch them. If the grater, having got on the seam, captures the lump of grout, the dent should be filled again and the surface of the seam should be leveled. For a complete setting of the grout, a certain time is required, the duration of which depends on the recipe of the mixture. Clearing the previous section of the cladding from excess mixture, occasionally stir the grout paste in the container so that it is ready to continue processing the joints in the next section.
Wet final cleaning
Moisture evaporation rate and full setting of the grout take from 5 to 20-30 minutes, depending on the type of tile, glue, type of substrate, humidity and air temperature. Moreover, the composition may harden very quickly on the surface of the tile, but will remain moist at the seams. To check whether the grout is ready for wet cleaning, it is tested with a generously moistened sponge in a small area of the lining. The mass in the joints should be dense, elastic, but not solid..
If the grout reaches for a wet sponge, then it is not ready for wet cleaning of the seams. The paste which has dried up to the surface of the tile can be removed for the time being with a special abrasive grater that does not leave scratches on the tile. Having cleaned the tile from dried grout, it is gently wiped with a well-wrung wet sponge.
To wet the cladding, you will need a bucket of clean water and a sponge with rounded edges, which does not leave grooves in the jammed seams. First, abundant grout is removed from the tiles and joints with a sponge moistened with a sponge, washing off the moistened particles of cement and sand with a soft circular motion and making sure that grooves do not appear in the jammed joints. The sponge is often washed and squeezed, and for each reception, an area of 1-2 square meters is cleaned. When processing a lined surface with an area of more than 8-9 square meters, water must be changed.
Having finished the first stage of wet cleaning, carefully examine all jammed seams and, if necessary, align them first with a smooth wooden or plastic stick of circular cross section and then wrung out with a wet sponge.
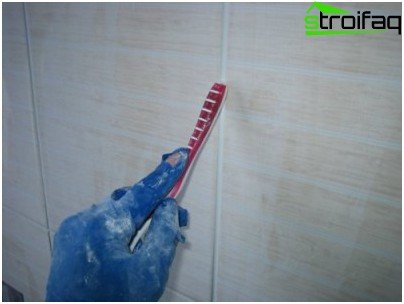
Before final wet cleaning, grout in the joints is smoothed with a smooth wooden or plastic stick of circular cross section
The seam width is set during masonry, but the shape is chosen in accordance with personal preferences and taste. As a rule, if the cladding is made of tiles with even sharp edges, the trowel is formed flush with them. With a rounded upper edge of the facing tile, the tiler most often chooses the shape of the grout, but he should not rise above the surface of the cladding.
In conclusion, the seams and ceramics of the cladding are cleaned no longer of grouting residues, but of a cloudy whitish coating, until it takes its final form and left for 15-20 minutes until completely dry. For unglazed matte tiles, until spots and muddy stains are completely removed, one or two more wet cleaning steps with water change may be necessary..
Grouts containing acrylic or latex additives are more likely to set and may be more difficult to wash off. If this happens, traces of grouting paste can be washed off with acid cleaners or a special plaque remover. Only formulations containing acid can be used after fully setting the grout.
Epoxy or polymer grout
It is very difficult to give advice on which grouting for tiles is better: it depends on the type of facing tile and the purpose of the room in which it will be used. Cement-based grout is easier to work with, but it wears out faster and requires periodic renewal. Grouting based on polymers and epoxy provides very strong and durable seams, allows you to create unusual decorative effects, but working with it requires special skill and must be done very quickly.
However, when working with cement-based grouting compositions at the final stage, the surface lined with matt hygroscopic tiles, including jammed seams, is covered with a thin layer of sealant using an ordinary paint roller. If the surface is lined with glossy tiles, only grout joints can be sealed with a thin brush with the composition. It takes 2-3 weeks to completely dry the grout and after that you can use the room, rejoicing in the beautiful durable floor, stylish bathroom or elegant apron on the kitchen wall.


